Let's face it. Wizards are handy. Sure, you can type stuff in, but it's nice to just click on a few controls and have the code generated for you. And Visual Studio has lots of nice wizards to do exactly what you want... well maybe not exactly. That's when you start thinking about rolling your own.
This article is about the process of writing a C# wizard to generate test fixture classes. I'm using NUnit version 2.0 as a test framework. It identifies test fixtures and methods by use of attributes, which seems in the .Net spirit. NUnit is an open source project so you can download and use it for free.
To make things a bit more interesting, I wanted my wizard to generate test stubs for each public method of an application class selected by the user. The class could be in the same project or another project in the same solution and will be chosen through a dropdown list.
There is a lot of info in the Visual Studio documentation for writing your own "wizards" but most of it is based on using the wizard dll that Microsoft provides. By use of templates, JScript and HTML, you can accomplish quite a lot. If you'd like to try this approach, take a look at Ron Jeffries' article.
But that's not what I wanted to do. I'm writing Windows forms code in C#, and I'd like to write my wizards the same way. So in this article, I'll first describe how to set up a basic "do nothing" wizard and then gradually add to it. The steps I'm showing are pretty much the order in which I figured it out myself, but since this is a how-to article, I've left out some of the false starts and dead ends.
The sidebar gives a preliminary introduction to how Visual Studio finds and executes wizards. You may find it useful to read this before continuing.
Let's get some boilerplate out of the way first. Create a new C# project using the standard Class Library wizard. Or if you prefer just type it all in... I don't care. My project is called WizardExample. I renamed the automatically created Class1.cs file as Wizard.cs and called the class it implements Wizard.
We'll need a few extra references. Use Add Reference and select envdte from the .Net tab. That brings in the object model used in Visual Studio. Since we'll be using a MessageBox now and a Form later, we also need a reference to System.Windows.Forms. When we create a Windows Application project, Visual Studio adds that for us automatically. But since this is a Class Library, we need to do it ourselves.
Edit the Wizard.cs file to add some using statements and a new attribute on the class. It should end up looking something like mine, depending on what you have called everything.
using System;
using EnvDTE;
using System.Runtime.InteropServices;
using System.Windows.Forms;

namespace WizardExample.Step1
{
        /// <summary>
        /// Summary description for Wizard.
        /// </summary>
        [ProgId("Wizard.Example.Step1")]
        public class Wizard
        {
                public Wizard()
                {
                        //
                        // TODO: Add constructor logic here
                        //
                }
        }
}
System.Runtime.InteropServices is the namespace that contains everything related to communication between .Net programs and older types - COM for example. We are using its ProgIdAttribute class when we apply the attribute of the same name to our class in the line
[ProgId("Wizard.Example.Step1")]
When it sees this attribute, Visual Studio does a lot of work that COM programmers
once did by hand. It creates a wrapper class that allows our class to be called
as a COM object. It also generates code to register our
dll correctly so that it can be located by its ProgId. The particular ProgId
you select is up to you. I put Step1 in the name so I could have several
versions of my wizard available at one time.
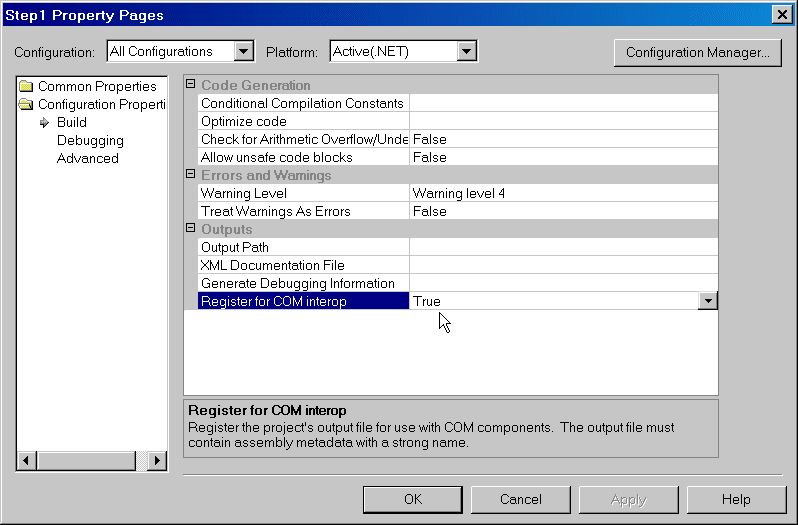
Before compiling this, we need to change a project setting so that the COM Interop registration is performed. Go to the project's property pages and under Configuration Properties look at the Build sub item. Change the setting "Register for COM interop" to True. Make sure you select All Configurations in the drop-down list when doing this. Otherwise, only the current configuration - probably Debug - of your dll will be registered when you build it. If you later switch to a release build, you'll find the wizard no longer runs.
When you compile, you should see the following message in the Output window.
Registering project output for COM Interop...Now we just have to make it do something!
What makes a wizard a wizard? Basically, it's a dll with a class that implements the IDTWizard interface. That interface contains only one method, defined as follows:
void Execute(
   object Application,
   int hwndOwner,
   object[] ContextParams,
   object[] CustomParams,
   ref wizardResult retval );
This is the method that Visual Studio calls to activate our wizard. See the sidebar for the meaning of the arguments.
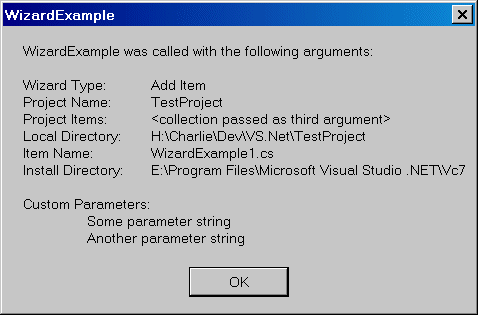
Just to have something for our effort, and to show how wizards get called, I fixed up the code for my initial wizard to display some information. Figure 3 shows what I ended up with.
[ProgId("Wizard.Example.Step1")]
public class Wizard : IDTWizard
{
    private string wizardType;

    private string projectName, itemName;
    private string localDirectory, installDirectory;

    private ProjectItems projectItems;

    public Wizard()
    {
    }

    public void Execute ( object application ,
                             int hwndOwner ,
                             ref object[] contextParams ,
                             ref object[] customParams ,
                             ref EnvDTE.wizardResult retval )
    {
        wizardType = (string) contextParams[0];
        string msg;

        if ( wizardType.ToUpper() !=
                EnvDTE.Constants.vsWizardAddItem )
        {
            msg = "WizardExample was called incorrectly."
                + "This wizard is designed to add items "
                + "to a project.\n\nThe .vsz and .vsdir "
                + "files should be installed in the";
                + "VC#\\CSharpProjectItems directory.";

            MessageBox.Show( msg, "WizardExample" );

            retval = wizardResult.wizardResultFailure;
            return;
        }

        projectName = (string) contextParams[1];
        projectItems = (ProjectItems)contextParams[2];
        localDirectory = (string) contextParams[3];
        itemName = (string) contextParams[4];
        installDirectory = (string) contextParams[5];

        msg = "WizardExample was called with "
            + "the following arguments:\n\n"
            + "Wizard Type:\tAdd Item\n"
            + "Project Name:\t" + projectName + "\n"
            + "Project Items: (collection passed as
            + "third argument)\n"
            + "Local Directory:\t" + localDirectory + "\n"
            + "Item Name:\t" + itemName + "\n"
            + "Install Directory:\t" + installDirectory + "\n\n"
            + "Custom Parameters:";

        foreach( string s in customParams)
            msg += "\n\t" + s;

        MessageBox.Show( msg, "WizardExample" );

        retval = wizardResult.wizardResultSuccess;
    }
}
The Execute method saves the information passed to it in various private fields of the object - we'll need them in later stages. It checks the first field before doing anything else to avoid exceptions which would be thrown otherwise. We're working in the late-bound world here, and we can't be sure we know the types of the objects we were passed without checking the context of the call.
If we were called as anything but an Add Item wizard, we can't do anything but give an error message and exit. If you'd like to see this message, I'll tell you how to make it show up later. If we were called properly, we get the rest of our arguments and display all the strings in a message box. The Project Items collection is something we'll use later.
Visual Studio invokes wizards through a file of type .vsz. Mine is called WizardExampleStep1.vsz and I saved it in my VC#/CSharpProjectItems directory. It really doesn't matter where I save it, but this will turn out to be a convenient place. It's a text file, and contains the following lines:
VSWIZARD 7.0
Wizard="Wizard.Example.Step1"
Param="Some parameter string"
Param="Another parameter string"
The first two lines are all that is required. The value given in quotes after Wizard= matches the ProgId of our wizard, which is how the system is able to find and execute it. The two param lines are just there to give the message box something to display.
We're not quite done, however. Visual Studio needs to be told to list this wizard as an option when adding a new item to a project. The Add Item dialog has a tree structure on the left and icons representing available items on the right. The tree structure is determined by the contents of the VC#\CSharpProjectItems directory in your Visual Studio .Net installation.
For this example, we'll make our wizard appear under Local Project Items. I created a file called WizardExamples.vsdir in that directory. The name I used is unimportant and I could even have edited the existing .vsdir file, but using a separate file makes it easier to avoid messing up other things. Initially, this file will contain a single line, a set of tokens separated by pipe symbols. Later, we can add other lines as we complete more wizards. See the sidebar for a description of the tokens. Unused tokens should be replaced by 0.
Here is the whole line from my file. It's broken into two pieces for readability but if you copy and paste it, put it all in one line.
..\WizardExampleStep1.vsz|0|Step 1|45|Just displays a message|
{FAE04EC1-301F-11d3-BF4B-00C04F79EFBC}|4515|0|WizardExample.cs
With these two files in place, we are ready to test. Run another copy of Visual Studio to be sure you pick up the new wizard. Later on, we may need to debug this, so it's convenient to set the project's Debug Mode to Program, and the application to the Visual Studio environment itself (devenv.exe) and run it that way. Open a project under your new instance of Visual Studio. Right now we aren't changing anything, but later we will, so a throwaway project is useful. I keep a TestProject around with a single class and a single form.
Select Add New Item from the Project menu or by right-clicking on the project in Solution Explorer. If you placed the files where I did, you should see an icon marked Step 1 under Local Project Items. If you highlight it, you'll see the text "Just displays a message". Select it and the dialog box should appear looking something like Figure 4.
If you aren't seeing the icon displayed under Local Project Items, either the .vsdir file is incorrect or you don't have a .vsz file at the relative location pointed to by the first token. If you see a message saying that your wizard can't be executed, you probably forgot to change the project properties to do the COM registration. If the program executes but some unexpected error is thrown, you can debug it by stepping through just as with any other library. Set devenv.exe as the application to run and set your breakpoint before firing off the wizard.
If you'd like to see the wizard display its error message, copy the .vsdir file into the CSharpProjects directory and the .vsz file into the VC# directory - that way the relative path will still be correct. Run a copy of Visual Studio and try to add a project. One of the choices is now Step 1. But when you select it, the wizard displays the message telling you that your files are in the wrong place.
You can put a copy of the .vsdir file into the Web Project Items directory if you want to see it when you're working on a web project. You can also make it appear in one of the subcategories, "Code" for example, by copying it into that directory and modifying the relative path to the .vsz file accordingly.
We still haven't generated any code using the wizard. In the next article in this series, we'll do that and even provide the user with a way to make some choices about how the code is generated. In the third and final article, we'll actually tailor the tests that are generated to a target class selected by the user.

